libapache2 mod_mono install freezing during install on Ubuntu at Digital Ocean
I had a problem with my libapache2-mod-mono install freezing during install when trying to run ASP.NET applications on Ubuntu.
The workaround for this is to open another session and restart/reload apache:
root@xyzio:/home/xyzio# service apache2 reload
root@xyzio:/home/xyzio# service apache2 restart
This is what I would see and the session would freeze at the [OK]:
apt-get install libapache2-mod-mono

Setting up libapache2-mod-mono (2.11+git20130708.6b73e85-2) ...
Using mono-apache-server4...
apache2_invoke: Enable module mod_mono
* Restarting web server apache2 [ OK ]
apache2_invoke: Enable module mod_mono_auto
* Restarting web server apache2 [Sun Dec 08 23:03:01.698809 2013]
[so:warn] [pid 4455] AH01574: module mono_module is already loaded, skipping
[ OK ]
Source:
http://askubuntu.com/questions/135547/how-do-i-set-up-mod-mono-on-11-10
AnalogDesert – A Free Android DigitalOcean App
AnalogDesert is a simple open-source ad-free Android app to check the status of your Digital Ocean Droplets.
Download it here:
https://play.google.com/store/apps/details?id=com.xyzio.analogdesert
Initial Setup:
Go to the settings menu and enter your Digital Ocean Client ID and API Key.
To get your Digital Ocean Client ID and API Key, log into your account and click on API.
Do you see bugs or want more features? Contact Me!
Analog Desert supports the following:
Droplets – Create, Destroy, Details, Disable/Enable backups, Password reset, Power On/Off, Reboot, Rebuild, Rename, Resize, Restore, Shutdown, Snapshot and Visit.
Images – View all global & personal images, destroy, transfer
Sizes – View sizes
Domains – View domains, domain information, create domains
Source:
https://bitbucket.org/xyzio/analogdesert
Screenshots:

New Droplet

Droplets Menu

Destroy Droplet
Private Internet Access Review – Only The Paranoid Survive
I bought a 1 year subscription to Private Internet Access (https://www.privateinternetaccess.com) about three months ago in order to protect my privacy when traveling and to ensure that my information was protected at my house. I live in a high density neighborhood where I can see at least 10 WiFi access points from my laptop. At home I regularly check my router logs to ensure there are no new users but I’m paranoid that someone will hack in and cover their tracks.
Private Internet Access gives you access to VPN clients in many countries. They assign you a username and password when you sign-up and this is used to log into their servers worldwide. They state that they keep no logs and store no data. However take this with a grain of salt and avoid passing sensetive information via non-HTTPS connections. For additional protection you can daisy-chain your own server in the flow to get more privacy.
I chose Private Internet Access because they were highly rated at the VPN sub-Reddit, they have a representative on Reddit answering questions, and because they offer clients for all major operating systems.
So far I’ve had no issues and they say they don’t throttle bandwidth. My usage is light but I have a feeling I might be restricted if I tried to pull 10TB of data through their servers.
Cost:
Private Internet Access is relatively cheap. At one year, it is cheaper than hosting your own VPN server and definitely much less hassle. A one-year subscription costs $40, one month is $7, and six months costs $36. It is apparent that they steer you towards the 1 year plan. They occasionally have discounts so keep your eye on the Reddit VPN page.
Android Client:
The Android client is very easy to use. Its usage can be summarized in three steps:
1) Download and install from the Android Play Store
2) Launch app and enter your username and password
3) Click the ‘Connect’ button
You can optionally select a server but it defaults to picking the fastest host.
A nice feature is that the app shows the current up/down transfer rate as well as the total usage for that session. However when transitioning from wireless to the cell network and vice-versa the app introduces additional delay as it gets disconnected and needs to re-authenticate with the VPN server. This is annoying because it usually happens when I’m walking out of a building checking my messages or getting directions.

PIA Android Login

PIA Android Select Server

PIA Android Status Screen
Windows Client:
The Windows client is equally easy to use. Installation and execution can be summarized in four steps:
1) Download from Private Internet Access
2) Run executable
3) Enter your password
4) Run

PIA Windows Connect Screen

PIA Windows Login Screen
Linux Client:
Linux client setup proved to be difficult. Rather than providing a client, PIA provides instructions to perform the setup. While the instructions worked in a graphical Ubuntu VM on my laptop, they do not work on my non-GUI DigitalOcean VPS. I was able to figure out an alternate way to perform the setup however it took a lot of digging. It would be nice if PIA incorporated instructions for manual setup and connection on their site.
Pros:
- Privacy
- It is cool to connect to server in Romania and see the Google Romania page show up. However using it is impractical due to latency
- Multiple sites around the world to reduce delay wherever you go
- Easy setup
Cons:
- Android client introduces delay as it re-authenticates when transitioning between data providers
- Private Internet Access says they don’t log data and that they would reject PRISM monitoring requests. Take this with a grain of sand and always encrypt your data! This does not guarantee that your data is not being monitored at PIA’s outgoing ISP or that your home computer does not have a keylogger. Or if they are really watching you!
Final Thoughts:
It is hard to see if connecting to Private Internet Access is protecting me. I’ve used it at home, around town, and when traveling in hotels, coffee shops, and airports. As far as I know none of my data has been compromised. I think it is hard to see if it effective, but it is an additional layer of protection and you protect yourself just by being more difficult to hack than the next guy. Ultimately the only way to be safe online is to not go online!
Mighty Plugs – World’s Finest Ear Plugs Review
I recently bought some Mighty Plugs Earplugs to help block noisy co-workers at work and to use while traveling. The earplugs are marketed as the ‘highest blocking‘ and ‘most comfortable‘ earplug in the world. They have a sticky putty like consistency which helps them mold to the shape of your ear. This stickiness allows them to attach to your ear without being too invasive.
My choice was between purchasing these or the Howard Leight Laser earplugs. I ended up getting the Mighty Plugs because I hadn’t tried them before and they seemed interesting. I’ve been using the Mighty Plugs for six months and so far they’ve been good. They mold to your ears and are good at blocking external sound. However they are expensive, sticky, and get nasty after a while.
I’ve decided to go with a pros/cons format instead of my usual review style. Read more below.
Pros:
- Mighty Plugs don’t go too far into the ear canal. The earplug molds into your ear cavity and canal to create a full seal. They form a good seal but can come out while sleeping or chewing. The Leight Laser plugs are more invasive and can also come out in similar conditions.
- 20 year shelf-life (so they say). Leight Laser earplugs will probably last longer due to their synthetic construction.
- Mighty Plugs last 25-30 uses but they pick-up dust and residue over time which reduces their effectiveness. Leight Laser earplugs last 2-3 uses and you can afford to have a new pair whenever you want. You also are not pushing in old buildup into your ears. Over the long run the Howard Leight earplugs are cheaper, 6 pairs of Mighty Plugs at 30 uses means one pack of 6 can be used 180 times. A box of Howard Leight will last at least 200 uses and you can get a new pair every time.
Cons:
- Sticky lanolin leaves a tacky residue on fingers and on ears.
- Earplus are sticky so they pick up dust, stuff from your fingers, and earwax from your ears. Re-use means you are pushing this stuff into your ears regularly. You also have to ensure you have clean hands before you start or you’ll contaminate the Mighty Plugs for the rest of your uses.
- Need to knead them for 30-40 seconds before first use and then 15-20 seconds for each subsequent use. Leight Laser earplugs are ready to go in about 2-seconds: squeeze, insert, and hold in place for a moment.
- Very expensive – 6 pairs for $20 plus $5 for shipping. Leight Laser earplugs are $20 for 200 with free shipping if ordering over $25.
- Shipping is padded by $1 when ordering from Amazon.com – Mighty Plugs performs a bait and switch to show matching price from their site but then rip off the user via shipping. This is probably done to make up the money they pay to Amazon for their commission since Amazon does not charge commission on shipping charges.
Overall:
This is a decent earplug. However, the tackiness, residue build-up, and expense are major detractions. Their tendency to break their seal is about the same that of regular earplugs coming out. I think they are good for office and other clean environments. They are useless for outside work due to their tendency to pick up dust from the air and your fingers.
Free Online Wordsearch Puzzle Generator
A Wordsearch puzzle is a puzzle that contains words hidden in a grid of text. It is a fun activity used to teach children spelling and to help memorize information like country capitals.
Interested in creating your own Wordsearch puzzle? Then try out the Free Online Wordsearch Puzzle Generator at http://xyzio.com/Projects/WordSearch/Default.aspx.
This Word Search generator was written in C#/ASP.NET and generates PDFs using the iTextSharp library.
Sample Page:

Wordsearch Example
Logitech Trackman Marble Mouse Review
I bought the Logitech Trackman Marble Mouse after finding the Logitech Anywhere Mouse MX to be too small for my long fingers. Excessive use was causing my fingers to cramp up which is not fun after a long day at work. It is too bad because I loved the Anywhere Mouse and found it to one of the best mice I’ve ever used. A co-worker suggested the Trackman because it was ambi-dexterous and it accommodates long fingers. I bought the mouse from Amazon.com for $23.
Looks
The trackball is very unassuming, there is a red ball at the top you manipulate with your fingers and two buttons on each side. One side is meant to be clicked with your thumb and the other side by your ring or pinkie finger. The top is made of a slightly textured plastic that doesn’t get

Logitech TrackMan Marble Mouse
uncomfortably hot with use. The bottom is the standard mouse black plastic with three anti-slip pads spread around it. The entire unit is sheathed in shades of an unassuming gray that exudes a sense of boredom.
Feel
The trackball feels like what you’d expect from a device made from cheap plastic. If feels decently comfortable in my hands, I can rest the palm of my hand on the base and stretch my fingers around it to reach the ball and buttons. The buttons are typical Logitech, the have a linear feel and click with very little drama. Each click is accompanied by a precise ‘snick’ that provides auditory feedback of the action’s execution. I can tell that these buttons are well made and that I can count on them to perform reliably for years.
The ball is smooth but is a little heavy and has quite a bit of friction. I have to put in more effort necessary to move it around, I can’t just flip the ball and move the mouse all the way across the screen. The ball is removable and this is a good thing because gunk tends to build up on the supporting pegs.
Usage
Becoming proficient in using the mouse takes a day or so, precise pointing takes some practice but you can go from opening the box to clicking links in Google in a couple minutes. The main left and right click buttons are easy to find and click. The 2nd set of buttons, meant to be used for back/forward while browsing the web, are useless. Clicking the buttons requires me to contort my hand beyond a comfortable level that is intolerable for any amount of time.

Logitech TrackMan Marble Mouse Separated
The ball is heavy and has a lot if friction. This makes it hard to scroll rapidly across the screen during regular use and I can feel fatigue in my fingers towards the end of the day. A big issue is that gunk from your fingers builds up in the ball supports which further impede progress. I find myself cleaning the ball supports at least once a day. The heavy ball becomes aggravating after a while and I feel like Logitech should have put more work in this part of the design.
Thoughts
Overall the Trackman Marble Mouse is a decent trackball considering the price. It has no fancy features and it does the work of the equivalent two button mouse. Having a sealed sensor means that the buttons or the ball will wear out before the sensor breaks. it also means that we’ll have precise sensing for the life of the product.
Annoyances include the extra buttons are useless and I think they were put there just for marketing reasons. Gunk tends to build up in the ball supports which requires frequent cleaning. The base doesn’t fit well in my hand – It would have been nicer if the base had been wider or had a slight dip for the base of my hand.
Pros:
Cheap
Ergonomic
Cons:
Useless forward and back buttons
Heavy track ball
Tendency to build up gunk in the ball supports
No scroll-wheel


Private Internet Access OpenVPN on Ubuntu at Linode or Digital Ocean
Update 9/14: These instructions no longer seem to work at Linode. Please leave a message in the comments if you see a mistake in my directions.
I’ve written about using Apache to proxy connections over SSH in order to hide sensitive information in public places. For an extra fee you can gain additional anonymity on the internet via companies like Private Internet Access which provides multiple VPN gateways for around $40/year without the risk of hacking or mis-configuration that comes with doing your own setup. You also get the ability to use VPNs in multiple countries and US locations thus further obfuscating information.
Private Internet Access has instructions on how to set up a VPN on Ubuntu using Network Manager. However I’m using a server install at Digital Ocean and I don’t feel like installing the desktop just to use Network Manager. In addition there is setup required to allow you to access the VPS while still routing outgoing data through the VPN. This should also work at Linode. Here is how to do it:
1) Install open-vpn : apt-get install network-manager-openvpn
2) Download a copy of Private Internet Access’ config files or if their site is down, here. Unzip the files in a new directory. The zip file contains everything you need to access their VPN servers without dealing with Ubuntu’s Network Manager.
3) Now you configure your VPS so that any traffic that comes to the VPS is responded to by the VPS. Otherwise once you start your VPN any attempt to connect to the VPS will be answered through the VPN which is not what the connecting software expects.
Type this at the prompt:
ip rule add from x.x.x.x table 128
ip route add table 128 to y.y.y.y/y dev ethX
ip route add table 128 default via z.z.z.z
Where x.x.x.x is your public IP y.y.y.y/y is the subnet of your public IP address ethX is your public Ethernet interface z.z.z.z is the default gateway To get the x, y, and z use ip route: ip route show. The last three lines of the output will look something like this:
93.115.84.202 via 127.0.0.1 dev eth0
128.0.0.0/1 via 10.155.1.5 dev tun0
127.0.0.0/24 dev eth0 proto kernel scope link src 127.0.0.1
Match the color coded output to the ip commands above. You need to type these in every time you restart your VPN so it helps to save them in a shell script.
4) Optional: Create a password file. You can create a password file to supply OpenVPN with your login info If you are lazy and don’t feel like entering a password every time you connect to Private Internet Access. To do this, make a file that contains your username on the first line, password on the 2nd line, and nothing else.
5) Start OpenVPN using one of the config files from step 2. Each config file is set up to connect to one of the VPN servers run by Private Internet Access. You can specify your password file from step 4 using the auth-user-pass argument. Here is what I use to connect to their Romania server:
openvpn –config Romania.ovpn –auth-user-pass password_file
Finally, check your IP using their ‘Where’s My IP‘ page.
Questions or comments? Feel free to leave a message using the comments box below.
Sources:
http://openvpn.net/index.php/open-source/documentation/howto.html#client
http://www.cyberciti.biz/faq/how-to-find-out-default-gateway-in-ubuntu/
https://forum.linode.com/viewtopic.php?t=8737
https://www.privateinternetaccess.com/pages/client-support/#ubuntu_openvpn
Fixing Windows White Screen of Death Caused by Malware
I recently had an issue on my Windows 7 Lenovo x230 laptop where it would boot up normally, let me log in normally, and then briefly show me the desktop before going to a solid white screen. When shutting down or logging off, I would again briefly see the desktop before my session ended. After some searching I found that this is a common type of malware and that it can be removed by booting up in safe mode with command prompt and then going back to a system restore point. Here is what I did:
1) Right before the Windows Boot screen comes up, press the F8 key to bring up the Boot in Safe Mode Menu
2) In the Safe Mode Menu, select the Safe Mode with Command Prompt option
3) The system will then boot into Safe Mode and you will see a Command Prompt window. In the Command Prompt window type %systemroot%\system32\restore\rstrui.exe to bring up the system restore menu.
4) Follow the prompts and restore to the earliest system restore point on your system. This will take a few minutes.
5) Reboot your computer. If you had the same issue I had then you should now be able to use it normally.
One last thing to consider is to go into the Programs and Features menu in the Control Panel and uninstall any programs you installed recently. A new program is often the source of malware since the install often requires you to give Administrator access.
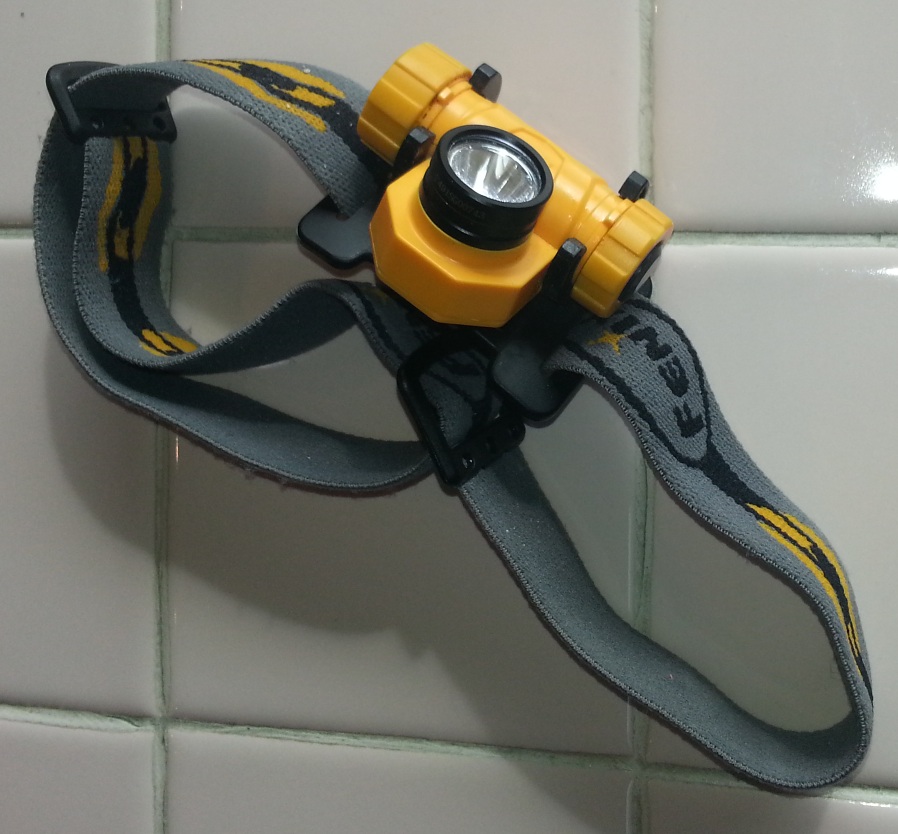
Fenix HL21 LED Yellow Headlamp Review
I bought the Fenix-HL21 to light my way during my early morning runs. My reason for choosing it is that the headlamp uses just one battery and the output is regulated so it wouldn’t slowly go dim and fade out. The one battery means that the headlamp is light which means it won’t bounce around when running. I bought the headlamp in December of 2011 and I’ve now had it for about a year and a half. I use it semi-regularly at night and for general work when I need extra light for a dark space.
Fit and Finish
Overall the lamp is decently but not well built. Unlike other Fenix products which have an aluminum body, the lamp body and battery compartment is made of plastic. The plastic is thick and feels decently rigid in my hand. The casing around the LED is made of aluminum and this is done to facilitate heat dissipation. The cap on the battery compartment has good sized threads which makes it easy to open and close. The plastic construction probably allows the big threads, most aluminum lights have tiny threads that are easy to mis-thread when screwing on the cap. The big annoyance is that the lamp attachment to the headband is not secure and the lamp can come off if you are not careful when handling it. I’ve had issues with my past Fenix lights where the negative terminal spring wears out and no longer makes contact with the battery. It hasn’t happened yet but I fear that it will happen one day.
Light
This is my second headlamp, my other lamp is a Zebralight which is floody and perfect for indoor work. Compared to the Zebralight, the light on the HL21 is highly focused and projects a decent distance. It is very diffuse and dim at the lowest 3-lumen dim setting but brightens up at the 43-lumen mid setting with the 90-lumens high setting being the brightest. It is hard to tell the

Fenix HL-21
difference between the 43-lumen and 90-lumen settings except that the 90-lumen is slightly brighter. This may be due to the logarithmic nature of our brightness perception. There is very little flood which means there is little light for your peripheral vision which means you’ll be swivelling your head back and forth when you are outside. In addition there is a small gap around the cap of the LED which means there is a ring of light that leaks out around the gap. If you don’t adjust the light high enough on your forehead this leakage shines into your eyes which is annoying.
Battery Life
Battery life in the HL-21 is decent. It is not great and definitely does not match the product listing, I can expect an Eneloop battery to last about 1 1/2 hours on medium and an hour on high. The light has a tendency to turn off abruptly instead of dimming gradually. This is probably due to the active circuitry used to maintain constant brightness and the non-linear discharge of rechargeable batteries. Low mode is incredible though, I’ve had the lamp stay on for two whole days with juice left over in low mode.
Comfort
The primary reason I bought the HL21 was because I expected it to be light due to the single battery design. The headlamp is indeed light and is ideal for running and night expeditions. The headband however only loops around the head without a piece that goes over the top of the head. This means that the lamp has a tendency to slip down my forehead unless I tighten it to the point

Fenix HL-21 Back
that it cuts of circulation to my head. In addition, the area where the lamp attaches to the cord is not padded and it leaves a mark on the forehead. The mark is especially deep when you wear the lamp for long periods and the mark persists for a while afterwards. Imagine going for a run in the morning and then heading to work with a strange red mark on your forehead.
Overall
Overall the HL21 is a decent headlamp for its price. it has a couple annoyances that shouldn’t be present at this price point but its worked out well so far.
Pros:
Multiple light modes
Light single battery design
Solid construction
Good focused light
Solid, decent construction
Cons:
Annoying headband
Possible weak internal spring
No peripheral light
Gap around lens cover shines light into eyes
Doesn’t work well with rechargeable batteries


Fenix HL-21 Night Shot
Fenix HL-21

Fenix HL-21
Aliasing a sub-domain to Amazon s3 at WinHost
One of the major problems with WinHost is that you don’t get much disk space, their base plan comes with not even 2GB but 2000MB. One way to stretch this disk space is to host images and other big files using Amazon’s S3 service and just keeping your ASP.NET/PHP e.t.c code files at WinHost. To make this hosting appear seamless to your visitors, Amazon allows users to alias a sub-domain or domain to their hosting service. This way users see your domain i.e s3.xyzio.com but the files are pulled from AWS.
The setup is not very complicated and takes about 2 hours, most of which is spent waiting for your sub-domain name to propagate. First, log into the AWS S3 console and create a bucket named after your sub-domain – s3.xyzio.com here:
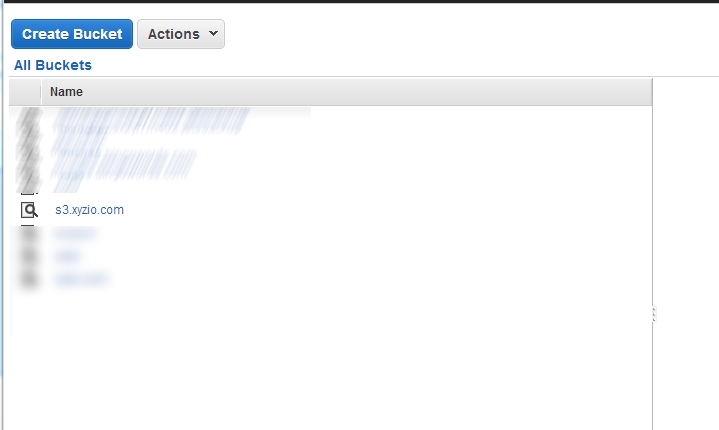
Create Bucket in Amazon S3 AWS
Then log into your WinHost control panel and click on DNS Manager. There under Manage CNAME Records enter your sub-domain for Domain Name, s3.amazonaws.com for the Destination and 3600 for TTL. TTL stands for Time-To-Live and denotes how long in seconds the alias is maintained before it is refreshed. Here setting it to 3600 means that it will be refreshed every hour:

WinHost CNAME Record Setup
Now wait for about two hours. Then you can access any file you’ve uploaded on AWS using the following format: http://<domain>/<directories>/<file-name>. For example, the image above is hosted on AWS at the following address: http://s3.xyzio.com/s3_cname/winhost_cname.jpg.
You can use https to securely link to your image. This will throw a warning message in your browser because the domain and hosted domain names are different i.e. https://s3.xyzio.com/s3_cname/winhost_cname.jpg.
Of course you can also link directly to your file using the AWS linking convention: https://s3.amazonaws.com/s3.xyzio.com/s3_cname/winhost_cname.jpg or http://s3.xyzio.com.s3.amazonaws.com/s3_cname/winhost_cname.jpg
And that is it. Now you can easily extend your disk space at WinHost without having to upgrade!
